 "Let's get the Heck out of here! There's another school bus on the horizon! I'm sick of this pony ride crap!"
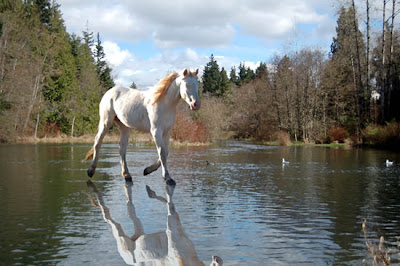
Okay, so I'd been thinking like most of you...something romantic. But Dan just had to win. Slightly altered in the wording (but not much) because, after all Dan, my grandmother reads my blog! And whilst all of you were dreaming up names, I was busy fiddling a bit more with the photo, eliminating the fence behind them so they appear to be running free.
Couple of questions popped up yesterday. Vicki, it was taken while we were in Oregon last week. Barn Goddess, I guess that half answers your question, right? They're not mine. I wish! They're horses at the BLM corrals in Burns.
I've had several people asking about the 'simple' way to cut and paste on photo shop, so figured I'd give you a small demo here today. You may recall that Geek Boy had tried showing me, but I couldn't remember all the steps. Then I got that photo shop magazine, which layed it out quite simply.
First thing you're going to want to do is have both of your images up on the computer. For me, that's usually a landscape and a horse. If the subject that you're moving has too many other things in photo with it, or if it's just a small portion of the photo, you can crop it down like I did with the Ghost.

Both images on my screen; the Ghost was cropped because there were more horses in the photo than I need.
Now, look down at your keyboard. Hold down the ALT key and the A key at the same time. No, you don't need to keep holding it. You just needed to give your computer the command that it's okay to shift an image over.
See that lady's eye up there on the right of my screen? Just beneath her eye, on the right side of the bar, is a little arrow. No, I don't know what that little bar is called. No, I don't know how to make it appear or disappear from your computer. I told y'all I'm not knowledgeable in this stuff. Not at all. It's just there on my screen whenever I pull up Photo shop and that's all I know.

That little arrow up on the right is what you're looking for.
So, you see that little arrow? Click it. It's a drop and drag function. Once it's clicked, move your cursor over the subject you want to move. Keep you finger on the mouse, and move your subject over to the background layer and drop it there.

The Ghost photo is now on top of the landscape.
You probably won't be too keen on how it looks. You may not like the remaining background image around your subject. Easy fix. Back over on that side bar is an eraser. Once you click the eraser, the task bar up above your images will change, and you'll be able to do things like select your brush size. This is important because you'll want a big brush for large areas, but it won't work so well when you're trying to get into tight spots. Select your brush size and begin erasing the background from your subject.

 I selected a large brush to begin removing the fencing behind the Ghost.
Once the background is erased, you can move you subject to wherever you want on your background by going back to that little arrow that drags the image around.
 The Ghost now trots on water.
There. Now you know all I know. Actually, you probably know more. Oh...the reflection? Um...well...maybe later. Time to get Darling up for school.
Oh...Tomorrow? Creepy. Yes, you asked for it, and you'll be getting it. I'm headed to Briggets to photograph the creepy spider thing. I hate all of you! (Ha! Just kidding...I only hate those who requested the creepy thing!)


4 comments:
Congrats Dan!
Technical photoshop stuff I don't understand...........
Girl, you rock that photoshop!
Girl, is there anything you can't do....? Raising sheep, hanging with chickens, PhotoShop pro....I am beginning to feel a little intimiated! HA!
Neat how the ghost trots on water! That photoshop stuff is pretty cool.
Great caption for a great picture!!
kelly asked: "Girl, is there anything you can't do....? "
Er...cook. I can't cook.
Post a Comment